Spring boot first contact
Jun 26, 2021
I’ve never really used java in production until lately, and actually for me it was kind of easy to get productive (whatever that means).
One of the main tools which have made it easy for me is Springboot;
so, since I never really created anything from scratch, in this post I’ll go through the basics, creating a spring MVC todo app with thymeleaf as the rendering template and storing the data to a h2 DB.
What is Spring Boot?
Basically Spring Boot is just an initializer for the Spring framework.
The question therefore becomes “What is Spring”,
from the definition in the introduction page of the documentation:
“Spring Framework is a Java platform that provides comprehensive infrastructure support for developing Java applications. Spring handles the infrastructure so you can focus on your application.”
digging a little deeper, Spring promotes a “pattern” to facilitate communication between classes while enforcing decoupling mainly through dependency injection.
The available spring modules give you common functionalities so that you don’t have to re-invent the wheel and you become productive right away.
These are divided in 5 groups:
- Core container, this provides the fundamental part of the framework.
- Data access, provides a unified abstraction over different db-driver APIs.
- Web, in this layer one can find the Web orientated features, MVC implementation
- Aop, which is in via of depreciation from Spring 2.
- Test facilities.
Getting dirty
The thing that trips me most is the ease with which one can bootstrap a project in SpringBoot, that’s the selling point, so lets get our java MVC todo webApp running.
The entire project can be found in the linked repo.
After choosing web and thymeleaf (for template rendering) this is what our pom.xml looks like:
<project xmlns="http://maven.apache.org/POM/4.0.0" xmlns:xsi="http://www.w3.org/2001/XMLSchema-instance"
         xsi:schemaLocation="http://maven.apache.org/POM/4.0.0 https://maven.apache.org/xsd/maven-4.0.0.xsd">
    <modelVersion>4.0.0</modelVersion>
    <parent>
        <groupId>org.springframework.boot</groupId>
        <artifactId>spring-boot-starter-parent</artifactId>
        <version>2.5.2</version>
        <relativePath/> <!-- lookup parent from repository -->
    </parent>
    <groupId>com.example</groupId>
    <artifactId>demoThymeleaf</artifactId>
    <version>0.0.1-SNAPSHOT</version>
    <name>demoThymeleaf</name>
    <description>Demo project for Spring Boot</description>
    <properties>
        <java.version>11</java.version>
    </properties>
    <dependencies>
        <dependency>
            <groupId>org.springframework.boot</groupId>
            <artifactId>spring-boot-starter-thymeleaf</artifactId>
        </dependency>
        <dependency>
            <groupId>org.springframework.boot</groupId>
            <artifactId>spring-boot-starter-web</artifactId>
        </dependency>

        <dependency>
            <groupId>org.springframework.boot</groupId>
            <artifactId>spring-boot-devtools</artifactId>
            <scope>runtime</scope>
            <optional>true</optional>
        </dependency>
        <dependency>
            <groupId>org.springframework.boot</groupId>
            <artifactId>spring-boot-starter-test</artifactId>
            <scope>test</scope>
        </dependency>
    </dependencies>

    <build>
        <plugins>
            <plugin>
                <groupId>org.springframework.boot</groupId>
                <artifactId>spring-boot-maven-plugin</artifactId>
            </plugin>
        </plugins>
    </build>
</project>
In order to get a helloWorld running we just need other 2 files, a controller to bind template and values, and a template-view:
Controller
  package com.example.demothymeleaf;

  import org.springframework.stereotype.Controller;
  import org.springframework.ui.Model;
  import org.springframework.web.bind.annotation.GetMapping;
  import org.springframework.web.bind.annotation.RequestParam;

  @Controller
  public class IndexController {

  	@GetMapping("/")
  	public String index(@RequestParam(name="name", required=false, defaultValue="Stranger") String name, Model model) {
  		model.addAttribute("name", name);
  		return "index";
  	}

  }
If you ever worked with any kind of MVC this is really intuitive, through the use of annotation all is terse and readable.
Template
this should be placed inside /resorces/templates/
<!DOCTYPE HTML>
<html xmlns:th="http://www.thymeleaf.org">
  <head>
      <title>index</title>
      <meta http-equiv="Content-Type" content="text/html; charset=UTF-8" />
  </head>
  <body>
    <p th:text="'Hello, ' + ${name} + '!'" />
  </body>
</html>
Those th:* attributes are used by thymeleaf to bind the values we inject with the addAttribute method in the controller.
You can find the code up to this point in the associated repo, tag one.
Adding H2 persistance to Springboot
For starting up the h2 DB we just need to modify the pom adding the appropriate dependencies:
       <dependency>
            <groupId>org.springframework.boot</groupId>
            <artifactId>spring-boot-starter-data-jpa</artifactId>
        </dependency>
        <dependency>
            <groupId>com.h2database</groupId>
            <artifactId>h2</artifactId>
            <scope>runtime</scope>
        </dependency>
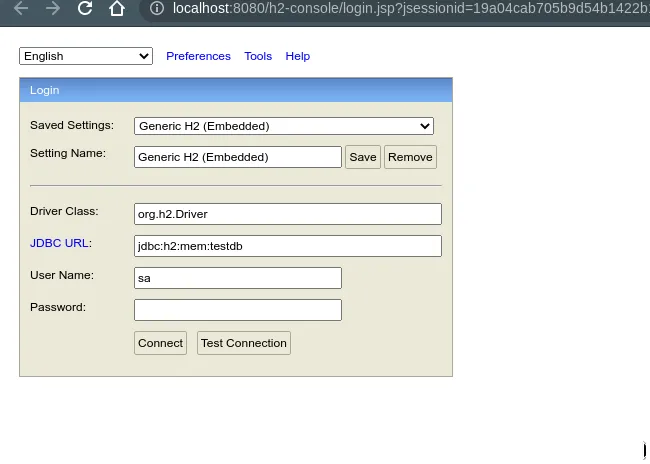
The configuration can be done directly in the application.properties
spring.datasource.url=jdbc:h2:mem:testdb
spring.datasource.driverClassName=org.h2.Driver
spring.datasource.username=sa
spring.jpa.database-platform=org.hibernate.dialect.H2Dialect
spring.h2.console.enabled=true
Setting spring.h2.console.enabled property to true enables the web-console at http://localhost:8080/h2-console.
This is a in memory db so turning off the app will flush the data (if you want to persist the data to a file you’ll need to set spring.datasource.url in your settings).
In order to seed the database we add a data.sql script in the resources, by convention springBoot will run it every time it starts up the application.
The sql script is rather simple it just creates a single table to store the todos.
Creating the service layer
The service layer in our case will be the one that the connects DB, model consumed by the view, and actions triggered in the controller.
Our model is represented by the Todo class, we’ll render every item contained in the Todo table with this class.
This will be done through, what is called in Spring terms the, repository (TodoRepo in our app).
Extending Springs CrudRepository class we get all the methods we need to iteract with the database that has been configured in application.properties.
// TodoRepo.java file
package com.example.demothymeleaf;

import org.springframework.data.repository.CrudRepository;

public interface TodoRepo extends CrudRepository<Todo, Integer> { }
In order to modularize access to these methods a service class has been created (TodoService):
@Service
public class TodoService {
    @Autowired
    TodoRepo todoRepo;

    public Todo todoById(Integer id) {
        return todoRepo.findById(id).get();
    }

    public List<Todo> allTodos() {
        return (List<Todo>) todoRepo.findAll();
    }

    public Todo save(Todo todo) {
        return todoRepo.save(todo);
    }

    public void delete(int id) {
        todoRepo.deleteById(id);
    }
}
Adjusting the index view
The index view is intended to be the view where we can list all the todos;
using thymeleaf’s conditional statements we can deal with the scenario where no todos are present:
   <table th:if="${todos.size() > 0}" border="1px solid black">
     ...
   </table>
   <div th:if="${todos.size() == 0}"> no todos, you can add one in the create form.</div>
What happens in the table is rather intuitive, a row is added for each todo available and we place actions for editing and removing each row (no JS is used, actions are just routes/navigation).
  <tr th:each="todo: ${todos}">
    ...
  </tr>
For identifying the links url we add a couple of utility methods directly in the model (todo.getLink & todo.getDeleteLink).
At the end of the page we also add an action that will route us to the todo creation.
Todo edit
The todo edit view is used both for creating and updating a single todo;
using a condition that checks if the id is present we make the switch between a new Todo or a Todo that has already been inserted.
This is what the action in the controller looks like:
@GetMapping("/todo")
public String readTodo(@RequestParam(name = "id", required = false, defaultValue = "") String id, Model model) {
    var todo = id.isEmpty() ? new Todo() : todoService.todoById(parseInt(id));
    model.addAttribute("todo", todo);
    return "edit";
}
In the post action the only difference between a new todo and one that has already been inserted is that for new items we add the creation date;
since we’re not using the date for anything it is just stored as string in the DB (in a real app you’d probably want to this differently but for our use case is enough).
The post action just saves title and description since we’ve set id, updatedAt and createdAt readonly in the UI.
Delete action
For the delete action we’re just using a regular get route which triggers the database operation and then redirects to the index;
in springBoot this is quite simple to do using the ModelAndView class, here is the delete action:
 @GetMapping("/todo/delete")
    public ModelAndView delete(@RequestParam(name = "id", required = false, defaultValue = "") String id, Model model) {
        todoService.delete(parseInt(id));

        var todos = todoService.allTodos();
        model.addAttribute("todos", todos);
        return new ModelAndView("redirect:/");
    }
You can find the code up to this point in tag two.
Summing up
In the end using an old school MVC was fun, although it’s true that creating an app client side permits to have much more control on the UI, this was not the point of the post.
Through this experiment I got the possibility to test SpringBoot in a context I knew what I was doing, hopefully you’re on the same boat :).
With Spring you can build all sorts of stuff, in my current project it is used for building Rest APIs consumed by client-side apps.
Apart the fun I had the fact it is probably the most popular java framework around must mean something.
In this post I didn’t make use of Lombok which will further improve the dev-experience, but this was done purposely to test the basics, if I really had to build something “futurable” I’d also add gradle instead of maven, and probably switch java with kotlin.
For any comment please feel free to reach out to me via mail, twitter or whatever.